WAIT A FEW MOMENTS FOR PICTURES LOAD ........
How to do it
(This page contains only some general clues about this kind of work!
For more precise clues please fell free to contact!) (Also my natural language isn't
English so it will be normal that some descriptions aren't correct.... If you can somehow
help us, please feel free to do so)
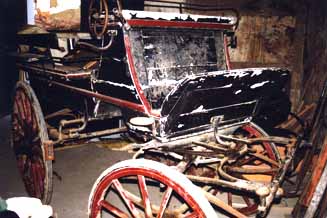
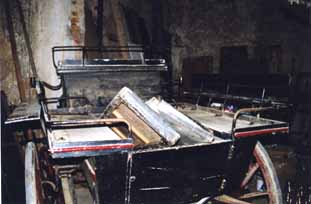
First Step - Cleaning the carriage
It is important that you start by cleaning the old carriage from dust, mud, oil etc. The objective isn't cleaning but to force you to pay attention to all the parts of the carriage - This is the best way to get to know the carriage and it's condition.
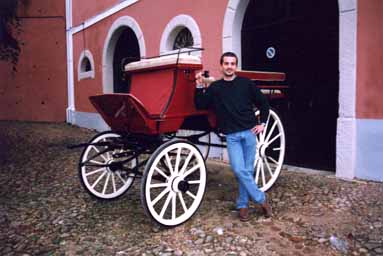
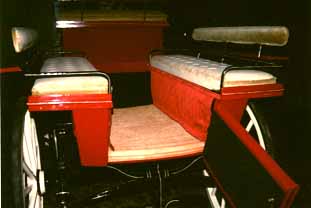
Second Step - Take photos of the carriage
Some Photos of the original condition (not only general but also of small details)
can sometimes help you when you have some doubts about how to finish your work - remember
that you'll be finishing the carriage some months after and sometimes you can not remember
all details.
Besides ..... it is always helpful when you want to show a friend how hard you've
worked.....
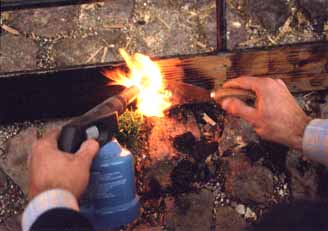
Third Step - Disassembling
If you've never done this before, then the first rule is to have a small book where you write piece by piece everything that you disassemble (For assembling again you just fallow the opposite order). If you're not going to do the upholstery yourself then it is better to take exact measures and drawings if it so that you can at the end demand for a precise work to the person that does it. When taking out the old upholstery, care about removing all old nails and the horse hair in the interior (if the is any) in one piece - so it can be used again. If there is a screw that it is harder to unscrew just us penetrating oil or heat it with fire (that usually helps) - don't worry, the wood won't burn if you're fast enough.... After disassembling all the top part of the carriage suspend the main chassis so that you can remove the main iron parts - Be careful when you do this: don't forget that 80% of the weight of the carriage is usually there and that accidents do happened).... At the end all the iron parts including suspension leaves shall be disassembled (mark them all!!!!).
Third step - Removing old ink
There are thousands of techniques for doing this job. If rust is too much you can send the iron to someone that removes old ink and rust with sand rain (it is not expensive and will give you excellent duration of the work). If you want to do it yourself then it is better to use chemical products with the ink over iron and fire with ink over wood. It is quite simple and after a few hours doing this job you'll be a master yourself.
If
it iron you must polish the surface and give a first coat of a chemical rust stabilizer
(don't forget that iron is a chemical unstable material) immediately after you've removed
the old ink and rust. If it is wood it is not so important to treat it immediately but
still if you polish it and give it a first base coat of ink you'll keep up with a good
rhythm of work (both iron and wood will be at the same stage). Note: of course you only
give a coat of ink to the parts that don't need to be repaired.
Fourth step - Restoring damaged parts
Old wood and damaged iron must be restored. If possible try always to make new
pieces if you don't trust the resistance of the old ones. Don't forget that in a
carriage everything works as a set. All pieces support dynamic forces during
driving, so, there can be no weak points. Fallow always this procedure and don't be
afraid to substitute everything that needs to be replaced - You'll thank yourself for that
in the future.
Repeat the final procedure of the Third step and give a ink protection to the
repaired/new parts.
Fifth step - Preparing for painting
All sets of wood/iron or iron/iron that are going to be firmly tight together must be assembled at this point (fifth well wood and iron parts and spring iron leaves) - Use fire assembling techniques or some printable silicone material to guarantee that the wood/iron sets are perfectly joined. Some people put oil between the spring leaves so the suspension will work better but I don't advise you to do that because this will create some difficulties with the final ink coats.
Sixth step - Painting
IRON - A - First and
Second coat of anti oxidation base ink - use rough water sandpaper to prepare the surface
for next coat;
B - 1 coat of color base ink - with color as close as
possible to the final coats of ink - use thin water sandpaper to prepare for next
coat;
C - 1 coat of color final ink - used very thin
water sandpaper to prepare for next coat.
(Before the final coat be sure to clean the surface very well and to wash the place where
you're working so that there will be no dust in the air)
D - Final coat of color ink
Do - Nautical varnish (optional) - some people like
to put a final coat of very strong nautical varnish.... for that just repeat the final
procedure but be extra careful with the chemical base of the ink that you're using
(both varnish and ink must have the same chemical base)
NOTE: You can use powder painting techniques with
the iron if you wish
WOOD - A - Fill all the holes with
some material good for that purpose (contact your ink vendor for that)
B - Second coat of general wood base ink (the first
coat was given in the Third step)
C - Use medium sandpaper for wood (don't use water
sandpaper techniques at this point) to prepare to next coat
D - 1 Coat of color base ink (as close as possible
to the final ink color) - use water sandpaper to prepare next
E - 1 Coat of color base ink (as close as possible
to the final ink color) - use thin water sandpaper to prepare next
F - 1 Coat of final color ink - use very, very,
very, very, very, very, very, ..... thin water sandpaper to prepare next
G - 1 Coat of final color ink
Go - Nautical varnish (optional) - some
people like to put a final coat of very strong nautical varnish.... for that just repeat
the final procedure but be extra careful with the chemical base of the ink that
you're using (both varnish and ink must have the same chemical base)
NOTE: You can use powder painting techniques with
the wood if it is a modern carriage but it is considered incorrect procedure with
old
carriages. There are brush techniques that give as good finish as the powder ones, though
they give more work. Besides.... don't forget that the brush goes deeper in the
wood than the powder so the coats usually last longer.
Seventh Step - Assembling main Iron Parts
Follow the notes that you took at the beginning of your work and you'll do this
quite easy.
Note: At this point you're asking yourself why I never talked about the wheels.... The
reason is simple.... The wheels are the exact finish of the restore work so they
are left behind until then.
Eighth Step - Striping the Main Iron Parts
If you know this page since last year than you know this tip..... But I must give it again.... Sorry...
Here are some clues on how to do a perfect and inexpensive striping: For starting you will need to make your own brushes. For that you will need to ask a friend with long and straight hair if he can give you some few of his hairs (not too many - you will need max. 10 to 12 hairs with 15 cm each). After that you must look at home for some ends of pencil (or you can slice a new pencil in 4 or 5 parts). After that you must get the pencil really sharp! Look for some glue tape and a very thin copper wire (about 50 cm should be enough). See the picture about what you need.
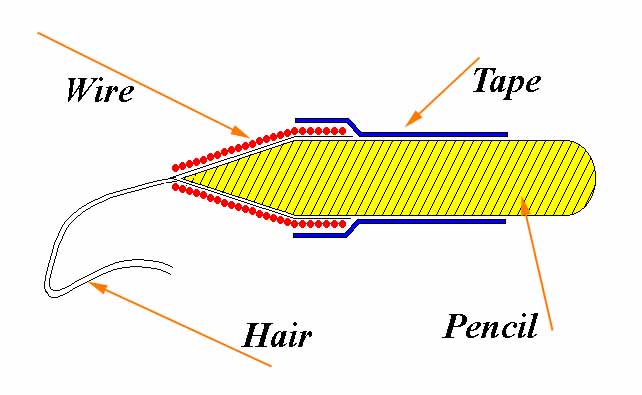
After this you must put 2 our more hairs (depends on the width of what you want to do
later) and put a small bit of glue tape just to get the hairs fixed to the pencil.
Grab the copper wire and start getting it around the grabbing part of the pencil (when
doing this be sure that the coppers turns are really fitting one after the other)
and start going down until the point of the pencil (See picture). When you reach the point
of the pencil do 2 or 3 turns and come back up to the starting point. After that
put the glue tape around the pencil so that the copper wire stays in place.
You can do several pencils with different length and width for the
different situations that you will have when restoring carriages.
How to become a master? That is quite easy. You must have a piece of
glass with 50 cm x 50 cm to start. Pick up the brush that you have just made and
pass it in the ink . Pick it up so that the point of the inked hair touches the glass that
you are going to stripe. Start pulling the pencil to you and at the same time start
getting it down and down until the pencil is at 2 mm of the glass and continue pulling the
brush/pencil until it runs out of ink.
Finished? Then pass a bit of old fabric over what you have done and
do it all over again. After 1 hour or so you will be doing this as perfect as any
pro!
Use this tip to strip the main iron parts (use the photos that you made at the beginning) or use sketches that you've made of the original striping work.
Ninth Step - Assembling The main Iron Parts in the Chassis
Once again, always follow the notes that you've taken at the beginning
Extra care at this phase of the work so that you don't damage the new ink ..... It is
better to ask a friend to help you with this step of the work....
Believe me..... I've been there....
Tenth Step - Assembling all other parts
Everything will now go to its place..... Once again following that famous notes and photos that you've taken..
Eleventh Step - Upholstery and Fabric
Try to do it exactly as the original. If you have never done this
kind of work start with small models of what you wish to do and when you're
satisfied with the quality then do it in the natural scale..... Usually your first work
will look (at your eyes) like garbage in a few months or after doing another
upholstery work again but don't worry.... that is normal.... you're improving...
The good thing about upholstery is that is easy to do it all over again.
If the carriage is a excellent piece then it is better to give the fabric and upholstery works to a professional.... that way you won't risk damaging the carriage.
Twelfth step - accessories
Lanterns, hub cups, leather outfits, carpets, whip holders, etc are some of the accessories that you need to restore or to buy to complete the restore of the carriage. This kind of work is better to buy it in the market or to leave the restore to professionals.... don't forget that even the old carriage manufacturers did this 100 years ago .... I bet they had their reasons...
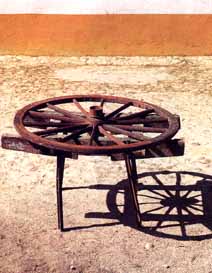
Thirteenth step - wheels
The general procedure about taking the old ink coats is similar to
the description above but it is better to start by the wood and after with the
iron.... (do it the other way around and you'll know why....)... After taking the old ink
out you must check if the wheels are OK... it is kind of difficult to explain how
to do this.... if you've never done this before then it is better to give it to professionals....
but still... here are some tips:
A - Put the axle up and make the wheel turn around
fast so that you can know about its dynamic condition... it should turn around like
a modern car wheel (Well..... more or less... I'm sure you know what I mean)....
B - If it seems that the dynamic condition is too
unstable then you must cut the outer iron (I don't know the name in English for
this) and take it out
C - make a special table so that you can hold the
center of the wheel horizontally and force the wood that supports the outer iron to
be always at the same distance from the table
D - check out the outside circle integrity
E - Replace and adjust wood parts if needed (this
must be a very precise work!!!!)
F - Cut out about 1% of the outer iron and weld the
two endings together
G - Make a big fire and wait until all the iron
turns red
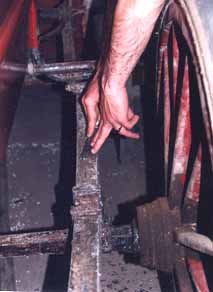
H - This must be done by four persons: with levers
that have a "C" iron at the end (picture) 3 of the persons grab the iron
ring and place it so that it goes 2 or 3 cm down the wood... the fourth person starts
putting water over the iron so it starts contracting.
I - With the same "C" levers, the 3
persons force the entrance of the iron ring so that it burns some of the wood and gets
perfectly adjusted.... the fourth person keeps on putting water over the iron ... pre
process continues until the iron ring is perfectly adjusted to all the wood surface
and it is cold.
J - Take some wood from the sides of wood near the
outer iron so that it can be uniform and with good presentation
K - If there is a rubber..... Cut the rubber
profile with the length that you find when multiplying the wheel diameter by 3,1 (a
number a bit smaller than PI so that the rubber can get under tension and stay always in
place)
L - use water to work as oil with the rubber so
that with a wood wedge you can force half the rubber length to be in place
M - Glue (the chlorides glues are usually good for
this) the two edges of the rubber and wait a few seconds
N- With thin iron levers (and water) force the
rubber ring to its place and finish work with the wood wedge
O - If the Hub is perfectly adjusted then you can
proceed otherwise and if the problem isn't too big you can cut leather rings to
adjust against the Hub base so that it gets a better vertical stability (This is a
terrible English..... I am sorry).
P - If the problem is too serious than you must
take the axle and wheel to a professional.
Q - Paint the wheels using the described procedure
R- Put them in Place